Caleb
-
Posts
15 -
Joined
-
Last visited
-
Days Won
6
Recent Profile Visitors
965 profile views


Caleb's Achievements
")


-
 IOAN reacted to a post in a topic:
Galleon Ship - First SIB Plan and Build Notes
IOAN reacted to a post in a topic:
Galleon Ship - First SIB Plan and Build Notes
-
ethanjhodgson reacted to a post in a topic:
Galleon Ship - First SIB Plan and Build Notes
-
Lboro reacted to a post in a topic:
Galleon Ship - First SIB Plan and Build Notes
-
Lboro reacted to a post in a topic:
Galleon Ship - First SIB Plan and Build Notes
-
Lboro reacted to a post in a topic:
Galleon Ship - First SIB Plan and Build Notes
-
Lboro reacted to a post in a topic:
Galleon Ship - First SIB Plan and Build Notes
-
Lboro reacted to a post in a topic:
Galleon Ship - First SIB Plan and Build Notes
-
Ezra reacted to a post in a topic:
Galleon Ship - First SIB Plan and Build Notes
-
IgorSky reacted to a post in a topic:
Galleon Ship - First SIB Plan and Build Notes
-
IgorSky reacted to a post in a topic:
Galleon Ship - First SIB Plan and Build Notes
-
A hoy, It's been a couple of years but finally back into it! My wife's first pregnancy gave us twins, which would you believe left me little spare time... but finally this project is down off the shelf! So I made a figure head, using a copper wire frame and layers of PVA glue to give volume, then painted white. She's meant to be an angel giving flight to a dove. I re-did the main bulwarks and added capping the to top of the rear section to match. This gave me light coloured bamboo on the tops of all handrails/bulwarks. I also added some stripping along the hull to break up the otherwise bland hull. I made these out of thinned bamboo skewers and bristles out of a brush. They also conceal the join lines of the three separate hull sections pretty well too. I shaped the keel, added a rudder and made some mounts. I am in no ways ready to sculpt an angry sea, so I've gone for traditional mounts, stained to give contrast. I made a capstan using a similar method as the helm wheel. Installed just behind the main mast. Installed the cannons on deck, and the helm wheel. Some door frames to the rear cabins A skylight for the rear cabins. This I made out of brush bristles, thin square cut wood, and yellow card stock to imitate stained glass. 3 gusset braces added to the very rear section. The curved stairs to the rear section I made out of many layers of thinned bamboo skewers glued together to give the tread. I love how they've turned out. I also added some simple grating to the front section, as I thought the deck looked a little bare. I've added all the rigging to the sails and masts and drilled the holes in the deck for the lines to pass through. I'm intending for some of the lines to come out underneath where the longboat will mount. Thus covering the cut off line ends. Some other lines will come and and be glued and cut off behind the stairs. Hence, the stairs and the long boat will need to be installed as a last step, after all the rigging is done. Ready to bottle! Any suggestions on the best way to glue the hull to the glass? Is epoxy the strongest and easiest to work with? I'll post again soon showing the full sail/rigging set up. Kind regards, Caleb.


- 41 replies
-
- 9
-
-
- first sib
- black pearl
- (and 1 more)
-
Ahoy, So I'm struggling to figure out a way to make the sails collapsable. The top few yards are narrow enough to fit through the neck without the need to rotate them, but the bottom yards need to be rotated. I've trialled this by securing the bottom corners of the top sails to their respective yards underneath. But it still seems to not easily allow the yards to rotate? Perhaps my sails are too rigid to allow free movement. Perhaps I should just be trying to secure the bottom corners of the sails to the yards once in the bottle? Any advice on this would be welcome. Also, I'm unsure of how I will run the diagonal rigging (like the top gallant stay) between the masts and then be able to assembly inside the bottle. I'm thinking I will be able to secure them all outside the bottle and set the spacing so when inside they will all be parallel. I've still got to drill into the side of the deck to allow the control lines to pass through from the main sails and backstays. Upon previous advice, I will now be attaching the yards as one in the bottle, not threading them through like I wrongly thought possible. For the yards I drilled out some thin wood, and then sanded the strips down even thinner and narrower post drilling. I then passed the yard lines through, glued and trimmed them. I will glue these little strips to the side once in the bottle. The backstays will pass through the side of the hull and come out the front. These should secure side to side and provide rear tension. The (royal?) top stays will provide tension forward. As for making the sails, I cut some cloth to size and ran some PVA glue along the edge and glued the thread. I knotted the top corners around a needle, glued with CA and trimmed the tail, in the same fashion as making thread blocks. These little loops allowed me to slip the sails onto the yards and secure with CA. I also added some detail to the prow. I cut thin strips of wood and soaked them in boiling water for a few minutes. This made them pliable and I was able to gradually curve them into shape and hold them there until they dried, keeping their curve. In all this handling, nearly all my handrails got bumped off. Not to worry I can re-attach/make more at the end now I know how to do it. Regards, Caleb.


- 41 replies
-
- 9
-
-
- first sib
- black pearl
- (and 1 more)
-
A hoy! I finally cracked the rear cabins and am happy with the result. The windows and stained glass are printed paper printed with a yellow grid pattern. To get the arched window frames raised, I bent a brush bristle in a tight radius to form a U. I then trimmed each side to length and glued their ends together. These got glued over the top of the printed paper, which got glued on top of a thin strip of wood. I capped the top of the windows with another piece of wood with a rounded edge for the roof. This rounded piece is slightly thicker than the first strip of wood. This allows it to hang over slightly which I like the look of. I beveled the corners of the side cabins roof with the rear cabins roof, again, just for looks. After a few attempts I made a helm I am happy with. I first made the spokes by lining up 8 bristles, I did an initial squaring off cut and then a final cut. This got all their lengths the same. Then I curled another bristle around a tight radius to make a coil. I then cut across the coil in the direction of its axis. This created a neat little circular ring. I drilled a hole in some scrap covered in double sided tape, and put the over length helm axle in the peg hole. This allowed me to line up all the spokes up against the axle. i removed the axle and the spokes stayed in position thanks to the double sided tape. I placed glue on the axle, placed the ring on the spokes and inserted the axle back in. After drying I could pry away the double sided tape, trim the axle length and I had a helm wheel! I also made the longboat using the plug and watered down PVA method. I found waxing the plug before layering it with PVA soaked tissue made it a lot easier to remove the dried mould. I added some seats out of some thin timber I cut down. I also made a grid pattern of bristles for the grating. I also added some stairs into the deck. I later coloured the walls black to add a bit of depth perception. I added some more handrails. I'll post again soon with details of sails and some more questions of course.


- 41 replies
-
- 11
-
-
- first sib
- black pearl
- (and 1 more)
-
Wow great idea! Thanks for the graphic too. I'll give it a try
- 41 replies
-
- 1
-
-
- first sib
- black pearl
- (and 1 more)
-
Caleb reacted to a post in a topic:
Galleon Ship - First SIB Plan and Build Notes
-
Aah righteo, I'll give that a try. Thanks
-
Nice work. The good contrast of colours makes everything stand out well.
-
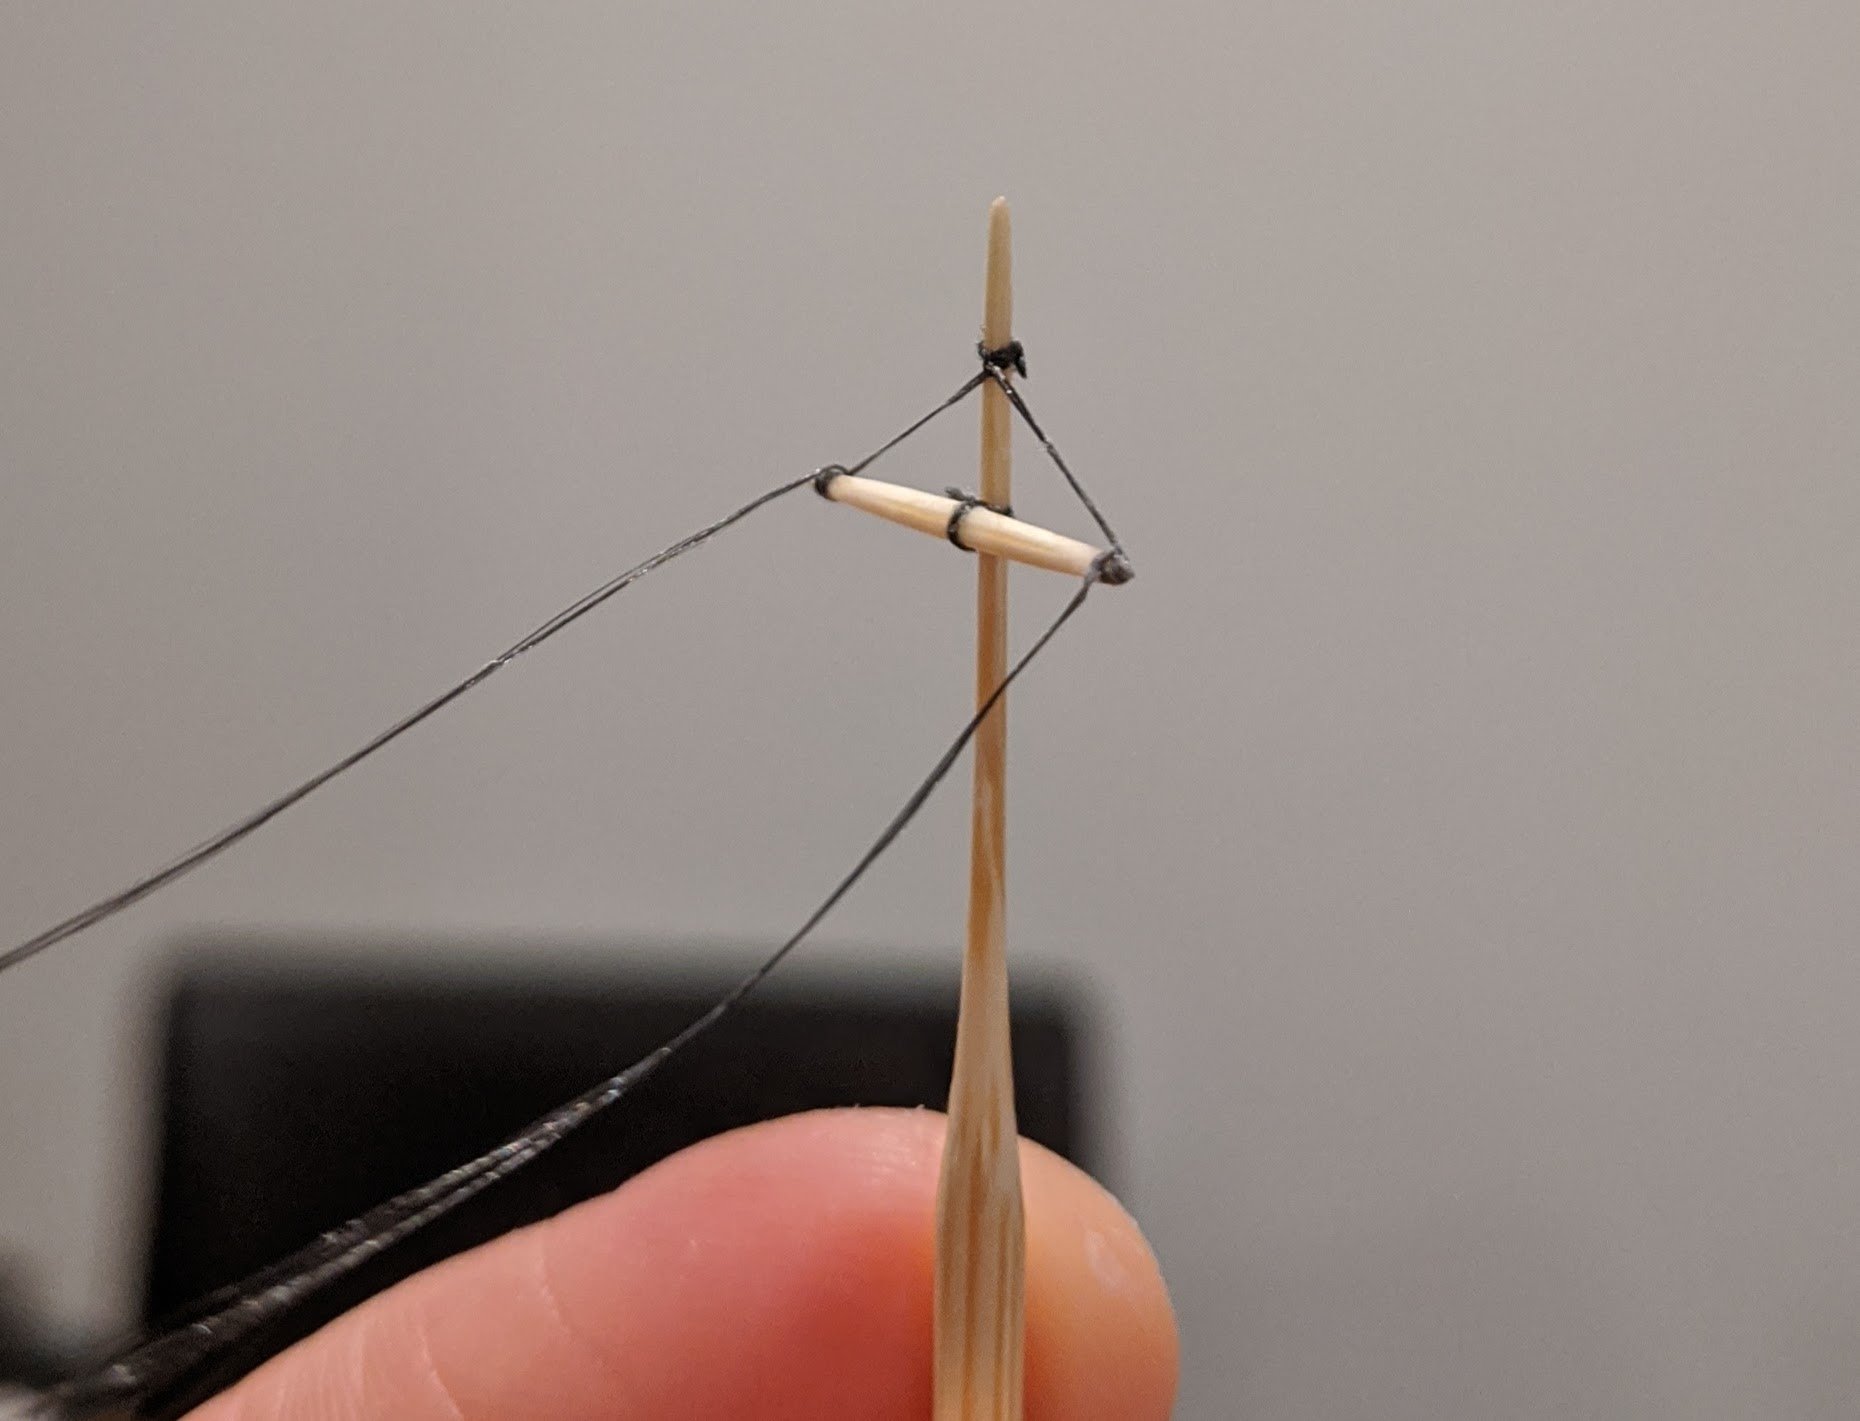
A hoy! I have been working on the masts, yards and ratlines. I bought some fly tying silk and it is very fine. However it is not a single strand, but multiple ultrafine threads laid up together. They are not braided together, which means they easily fray and seperate. But I'm reasonably happy with the results I've got for the ratlines. Shroud lines are standard sowing thread. I set the shrouds up with the correct number of strands and angle, then overlaid the silk ratlines. With tape holding everything in place I dabbed super glue all over it, then absorbed/wiped up the excess glue. Following Onni's advice, I will fix the shroud lines to the mast now, and then glue the base of them to the hull sides later. I made each side of the shrouds on the same strands. This allows me to simply fold the shrouds in half and tie to the mast under the platforms. I've noticed a lot of folks drill holes in their masts and yards to pass rigging through, however it sometimes requires larger mast/yard diameters to allow a through hole. I've chosen to try and keep the mast diameters small, and taper my yards in an attempt to be scale. It means I can't drill through them, I've tried to no success with a no.75 drill. So I'll have to come up with another solution for running rigging between the yard tips, I think it will involve thread blocks. I've experimented with yard braces. It works well I think. There is a small thread block tied to the mast and the yard braces passes through it. When the yard is pivoted to be parallel with the mast (for bottle entry) the line goes slack. When the yard is then pivoted to perpendicular the line goes back to tight. Convenient geometry of triangles and pivot points. My latest problem is how to make the rear cabins. I need to build them up because I haven't carved them out. For shaping the actual windows I can't cut timber panels accurately enough, nor does the grain of the wood allow it. So I have experimented with two methods of creating windows: One is to stamp the shape. So I made a little metal punch to stamp the shape of the window onto a piece of wood that I can then glue to the sides and back. The second is to try and imprint the shape of the windows onto a piece of wood. I bent some tin to shape and sharpened its edges. A light tap imprints the profile. Neither of these methods produce amazing results but it's better than nothing. Does anyone have a way of reliably repeating the exact same cabin window shape? My next major tasks are to work on the prow detail and stairs on the deck. Hope you're all staying safe. Regards, Caleb.


- 41 replies
-
- 13
-
-
- first sib
- black pearl
- (and 1 more)
-
Those white hand rails up the front are fantastic! Do you mind sharing how you achieved them please?
-
Caleb reacted to a post in a topic:
HMS Wivern by Chausseur
-
Caleb reacted to a post in a topic:
HMS Wivern by Chausseur
-
Caleb reacted to a post in a topic:
What's on your workbench?
-
Ahoy, It's been a very busy month but I finally managed to squeeze in a few hours this weekend. I masked the channel line and cut grooves down to take the bulwarks. I glued the bulwarks on too thick on purpose. This allowed me to sand them down thinner to shape and allowed me to try and make the join between the bulwark and the hull flush. I will be running a channel along the join to hide it better anyway. I spent a fair bit of time making some little cannons. The cannon barrels are from bamboo skewers turned down and blacked with a felt tip pen. The wheels are bristles from a dust brush. The bases are from bamboo skewers cut/sanded flat and cut to size. Glued together with PVA. I still need to trim the barrel lengths down, right now they are easier to handle. I store them on the sticky side of some tape. Saves them getting blown away. I also experimented making some hand railing for the forecastle deck, again using brush bristles and bamboo flats. I'm experimenting with hatching. Using blacked bristles here. I laid them up, spread PVA all over, then wiped off the excess and allowed to dry. I'm still not sure if I'll use this method, or try another. I also started glueing the bulwark handrails on. I will cap with a thin strip of bamboo flat on top of the black bristle shown below. I'm thinking of buying some fly tying silk to start experimenting with shrouds and ratlines. How do you folks deal with fly tying silk having a flat profile? Not round? I read somewhere that someone tried splitting the threads. Or is that not required and the flat profile is that that noticeable? Thanks all, I hope to post again soon.


- 41 replies
-
- 12
-
-
- first sib
- black pearl
- (and 1 more)
-
Caleb reacted to a post in a topic:
Thread, Silk, Rope, etc
-
Caleb reacted to a post in a topic:
Fly tying thread for rigging
-
Ahoy! Alan, an impressive gadget you have there. In my research I have previously read and bookmarked the "width of deck planking" topic. A lot of good info in there. If I decide adding deck lines will really help the model, I think I will experiment with the most basic method first - colour printed paper. Then I'll try the other methods mentioned. I'm just mindful that good decking looks excellent, but poor decking often looks worse than no decking at all. DSiemens, I like your idea of running the bulwarks down and using the channel below to cover the join line. To do this, I need some very thin strips of the same timber. So, I had a crack at making some. To save my fingers from being sanded off, I placed two staples into a straight piece of timber. In between the staples I put a thin piece I cut off (first photo). I could then sand the thin piece down using some sandpaper held on a flat work surface. The staples held the piece in place, and spared my fingers (second photo). Doing it this way allowed me to get a fairly consistent thickness. I followed up with some hand sanding using a block in one hand and holding one end of the thin strip down to the table with my other hand. I got them to 0.8mm, the staples do not sit very high off the sanding block so they do not contact the sandpaper. I can go thinner if I need (third photo). I tested the "channel bulwark" method on a piece of scrap. Using an exacto knife I cut the channel. I think it will be achievable. More suited to my level than Alan's deck carving. The photo below shows the new veneers up against the channel. This next stage of course brings new questions. Plank bending? The bulwarks need to curve rather sharply around the front deck, what's the best way to curve thin strips without cracking them? I've previously steamed balsa to get it to achieve sharp curves. I've read on here of the "soaking and grain break" technique. Any others come highly recommended? Thanks again folks, Caleb.


- 41 replies
-
- 9
-
-
- first sib
- black pearl
- (and 1 more)
-
Jeff, You're right, it looks just like it. It was strange though, becuase only two of the timber cross members were the American maple hardwood, the rest of the frame timber was pine. Maybe it was a strength thing...
- 41 replies
-
- 1
-
-
- first sib
- black pearl
- (and 1 more)
-
My next challenge to consider is Bulwarks. On a scrap piece I tried chiseling/ dremel sanding down a deck, and leaving a thin blulwark, like Alan did on his Pearl. I did not get much success. I was not satisfied with the deck not being perfectly flat, and the inside edge of the deck to the bulwark not being "crisp" or sharp. I'll have one more attempt before moving on. I'll try and follow Alan's guide to deck recessing: I'm not sure if my timber is too hard, most likely my skills are too barbaric. So I'm thinking I will go for glued on bulwarks made out of veneer or something similar. I'm tossing up weather to attach them straight on top of the deck, flush with the outside of the hull, or to notch the hull/deck edge and recess the bulwarks in a little. Gwyl Blaser posted a link to an image of how he recessed the bulwarks in. Again, I would like it all to look "seamless". I see DSiemens glued a thin strip over the join of the bulwarks to the hull in his "beginner Sloop". Without planking the hull, are there other methods to seamlessly add bulwarks? Thanks everyone again for all advice and help.
- 41 replies
-
- 1
-
-
- first sib
- black pearl
- (and 1 more)
-
 Caleb reacted to a post in a topic:
Going for Gold Build - Bessie
Caleb reacted to a post in a topic:
Going for Gold Build - Bessie
-
Caleb reacted to a post in a topic:
Going for Gold Build - Bessie
-
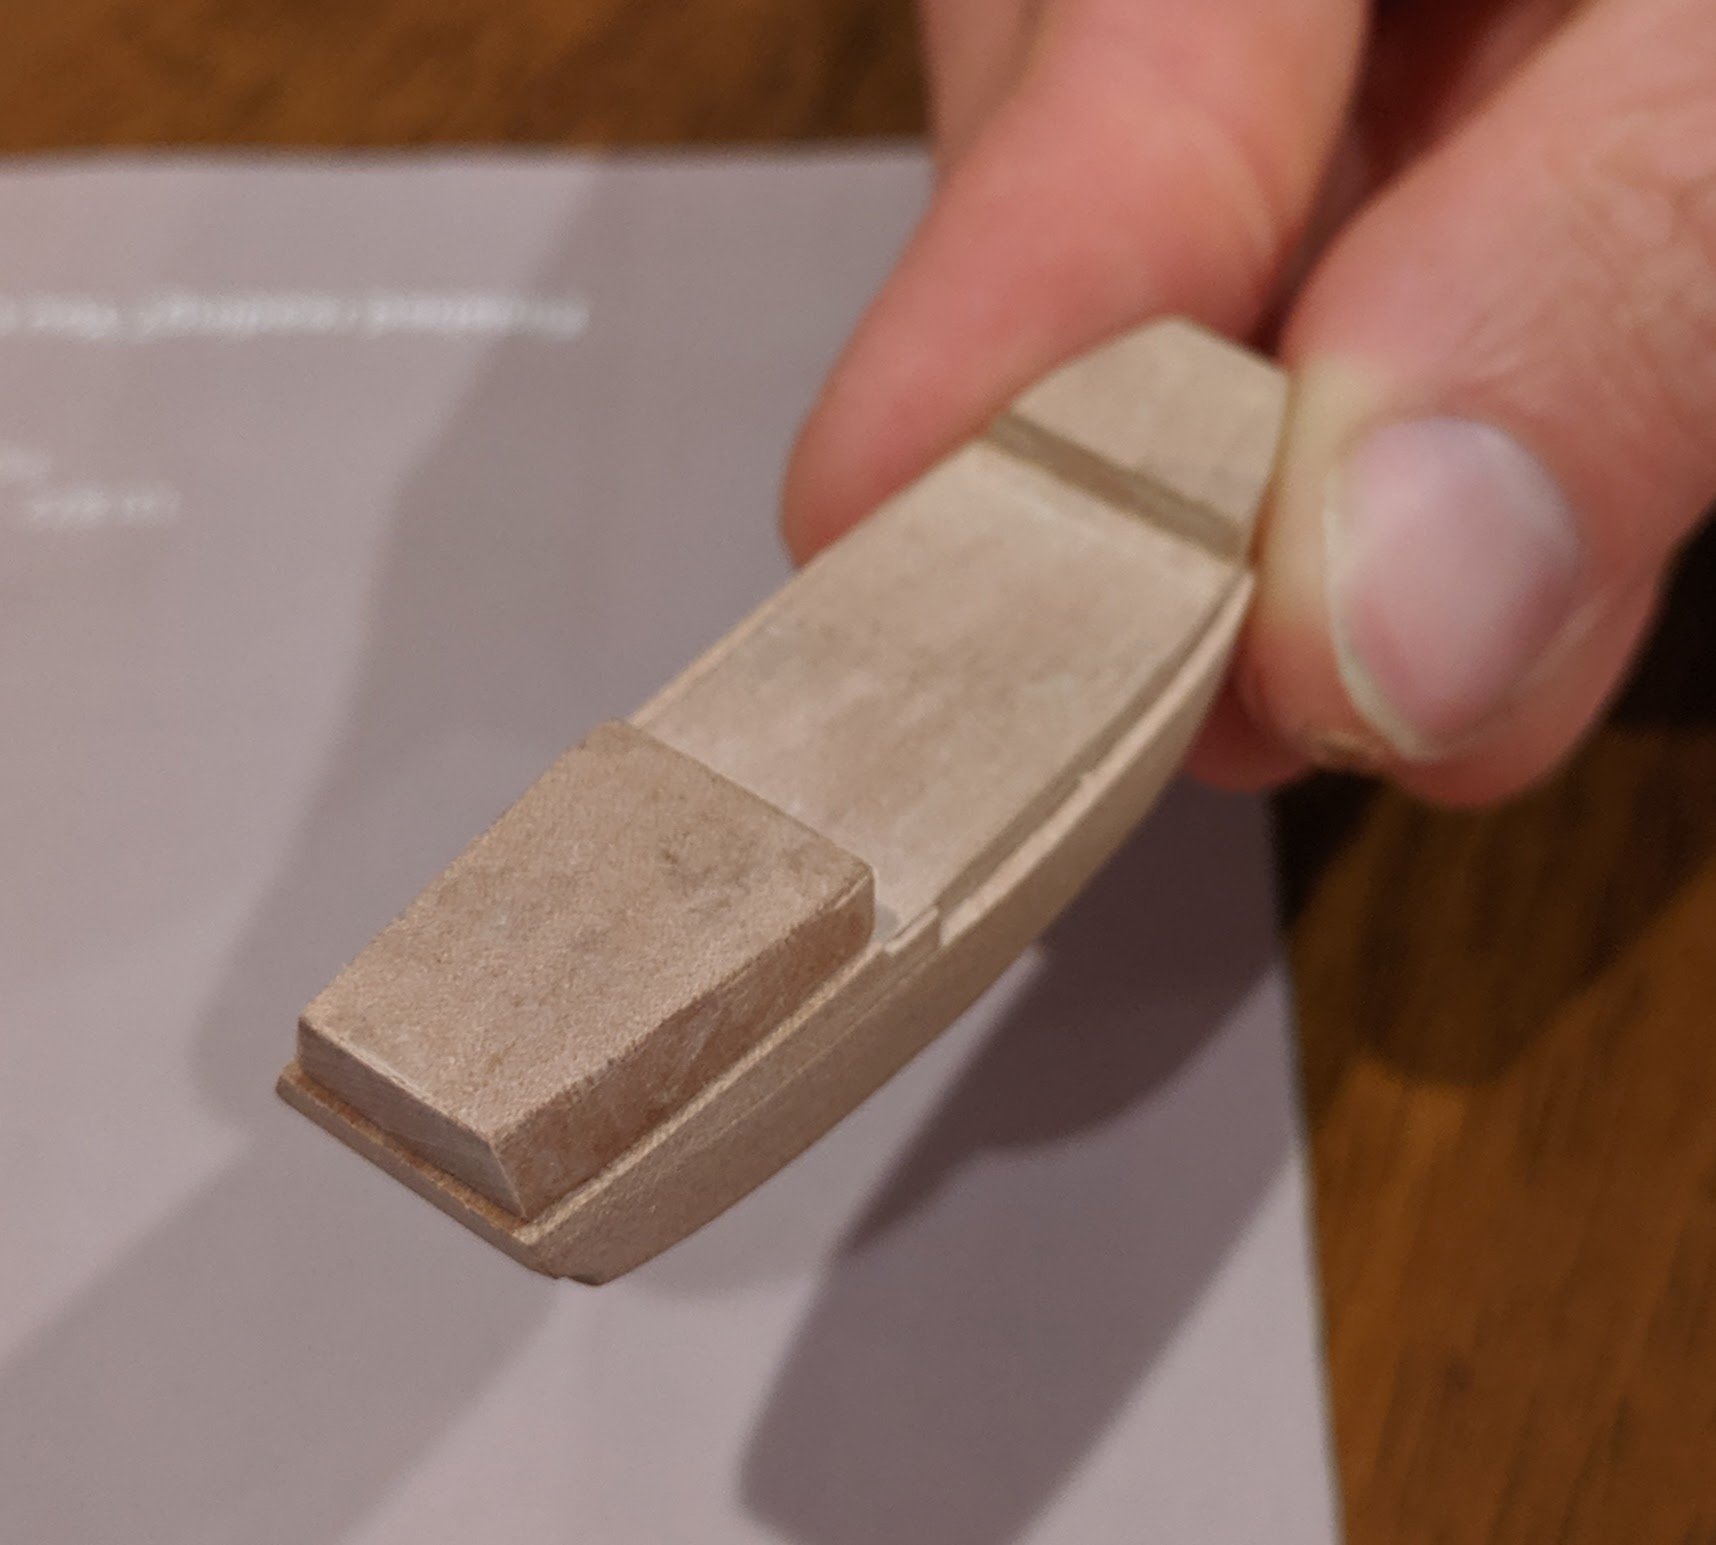
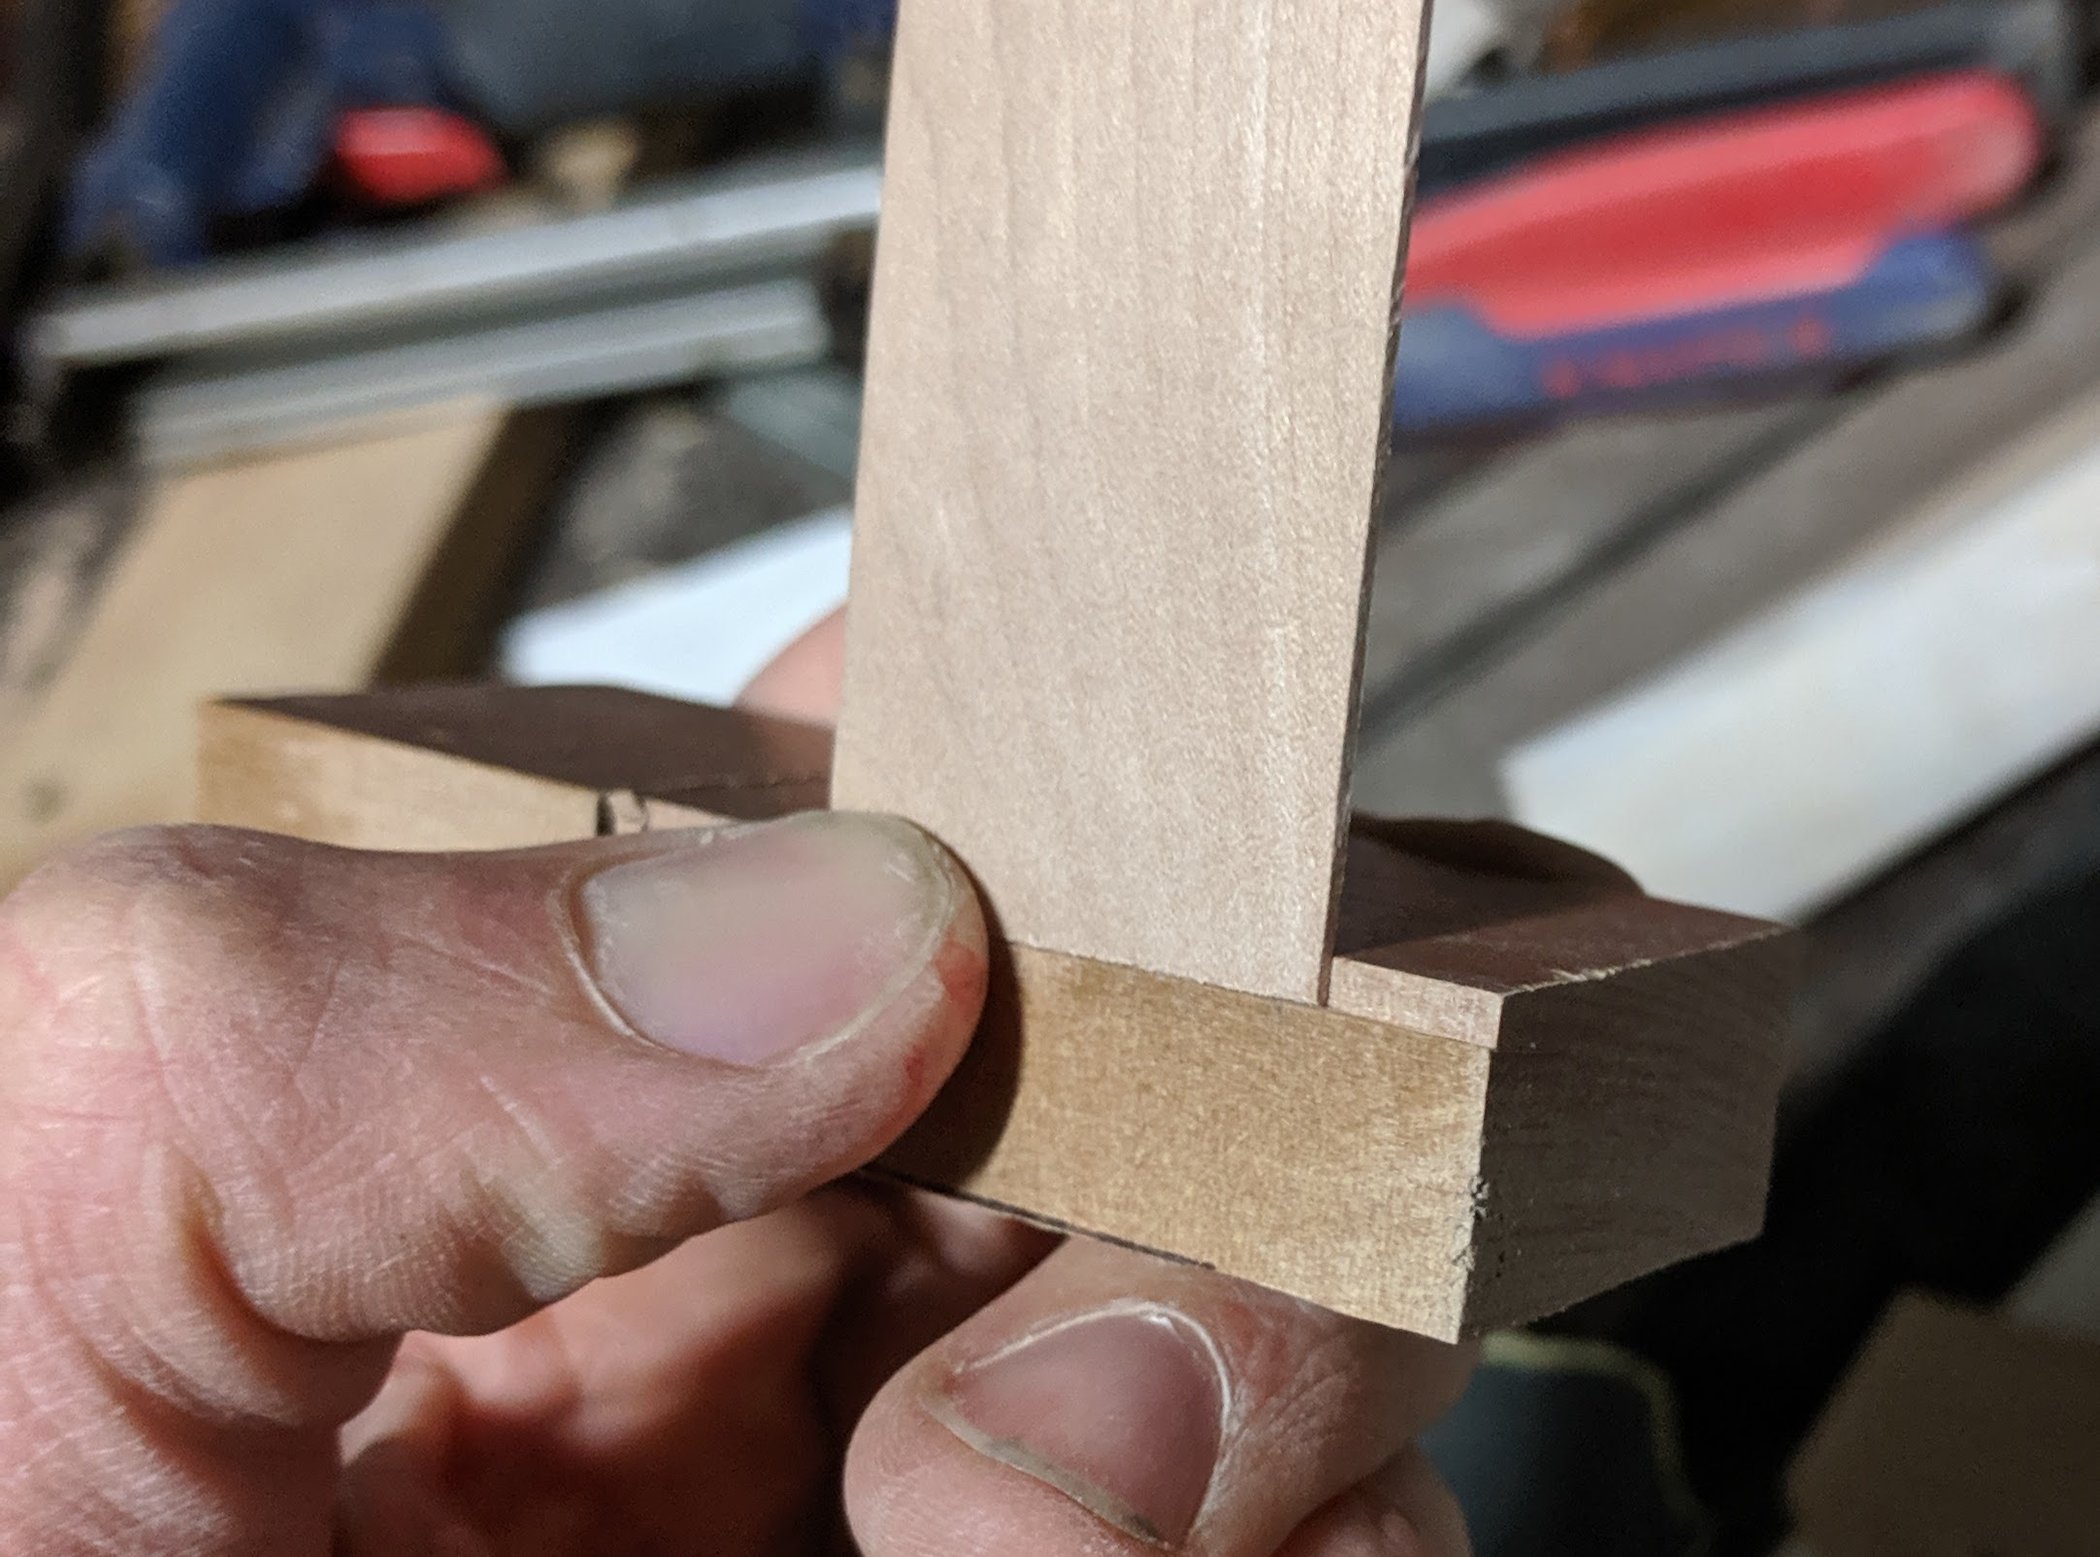
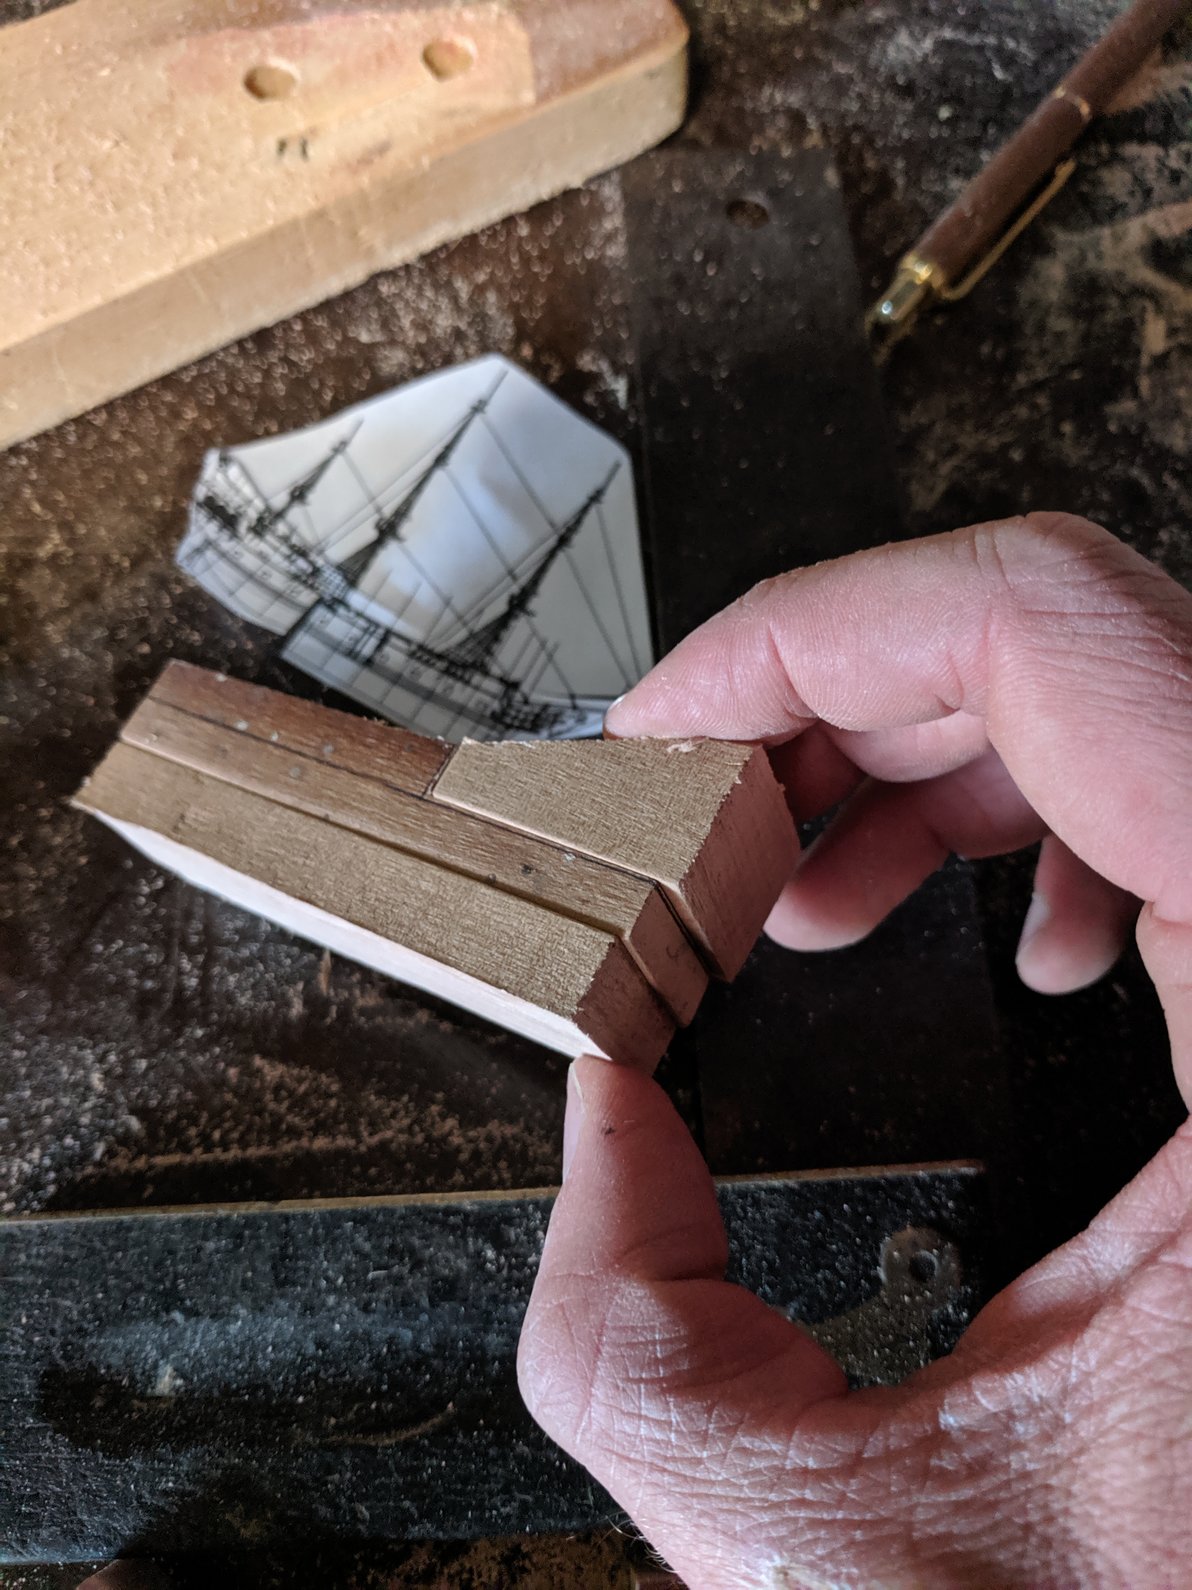
Thank you everyone for the advice and warnings. I've found some nicer timber to use, but I have no idea what it is, any ideas? It came out of the frame of an old worn out LazyBoy recliner chair we threw away. The photo below shows it has a really fine grain structure. It sands, cuts and chisels nicely. You can see I chiseled of the corner of the bottom piece, and you can hardly see the grain. I really don't want the split lines to be visible and because I won't be planking the hull, the mating surfaces must be perfectly flat to each other. So my new bit of timber needs to be sanded dead flat. I find sanding such small widths by hand often creates a rocking motion, resulting in a slightly curved sanding surface. So I placed a sacrificial block each sight to stabilise my sanding. See photo. I can't just drill through the hull stack to make the dowel holes because I can't have them seen (not planking), so I drilled one side, inserted a little dowel peg tool into the shallow drilled hole and pressed the two sides back together. The sharp little point of the dowel tool (sharpened, cut down nail) made an indentation on the adjacent hull section. I could then drill out the matching dowel hole. The below photo shows a bamboo dowel on the left, and the little dowel marker tool on the right, leaving an indent. So I now have my hull stack doweled and ready for shaping!


- 41 replies
-
- 9
-
-
- first sib
- black pearl
- (and 1 more)
-
Caleb reacted to a post in a topic:
Schooner Eagle
-
Caleb reacted to a post in a topic:
Schooner Eagle
-
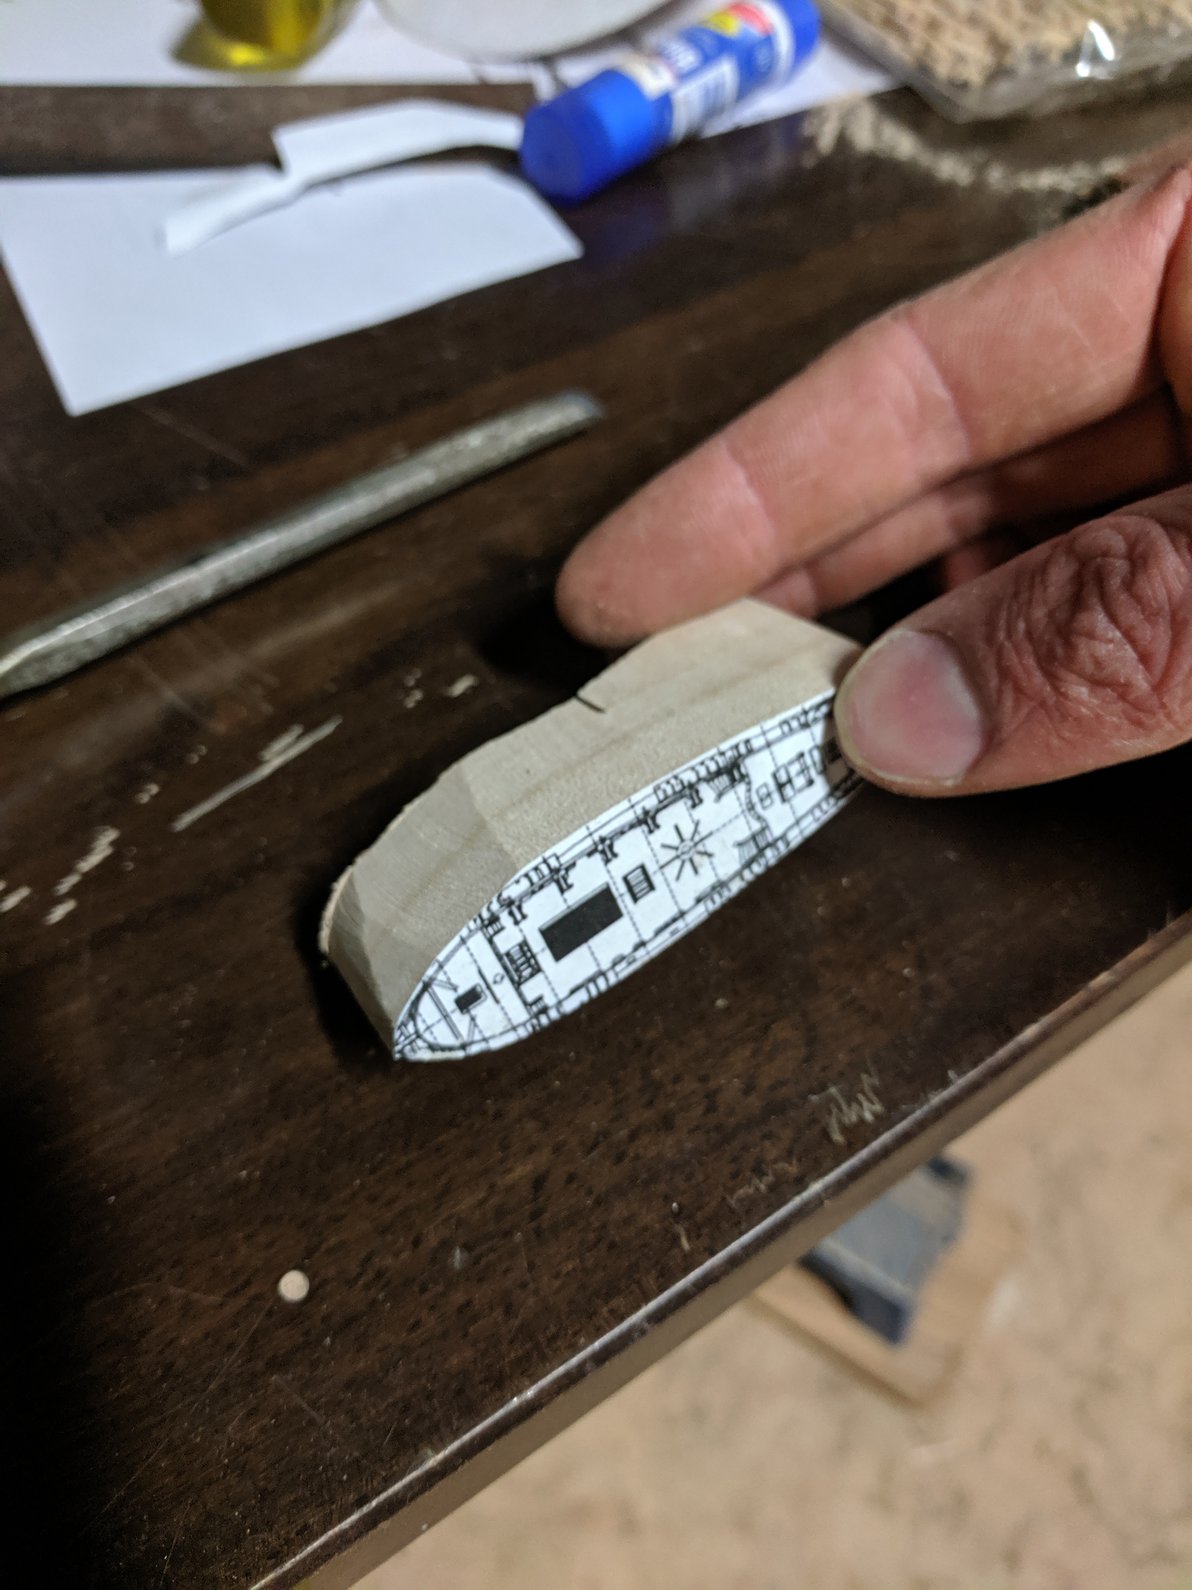
Ahoy, I'm attempting my first SIB! I'm basing it off Alan's (exwafoo) Black Pearl plans. But more with a USS Constitution colour scheme. It is to go into a fittingly named, Captain Morgan - Black Spiced Rum bottle, 77mm internal diameter with an 18mm neck ID. I've taken inspiration in terms of aesthetics and build techniques from many of the build logs on here. I really want the ship to fill the bottle, as you say, so I have slightly stretched the plans to make the ship longer. I'm too scared of splitting a hull down the middle into left and right, so I will split it at the waterline, and add a small section for the rear high section, see sketch. It will be too tight to have fold down masts this way, so I will assemble them in the bottle and rigging and shrouds will pass through the hull, in a similar fashion to David's W. H. Dimond (DavidB773). I like the idea of the full ship hull being displayed, so I won't be doing a sea. Thus, the lines that need tensioning can't come out under the waterline... I'm thinking I will pull them up through the deck, glue, trim, and cover with deck items, like life boats, grating, etc. I'm trying to familiarise myself with all the terminology, and methods of rigging. Please feel free to pick apart my sketched plans below and let me know of any improvements or things to watch out for. Also, even though I will most likely be painting the hull, should I buy some Basswood to make it out of? Does it make thing a heap easier? I'm currently planning on using some Tasmanian Oak I have left over. It's a commonly available hardwood timber down here in Australia. Kind Regards, Caleb. Some methods of how I intend to do the masts and yards. Are loops required for the top of the square sails all the way along the length of the yard? Or were they only ever held at the corners/ end of the yards? How I plan to split the hull in three to make it fit through the neck. Showing how the rigging can tensioned through the deck. Is this mostly accurate? Showing Yard rigging.


- 41 replies
-
- 11
-
-
- first sib
- black pearl
- (and 1 more)
-
Ahoy from Australia! I've been creeping around the forums for a while now trying to learn all I can from discussion topics and build logs with the hope of starting my first SIB soon. I'm a mechanical engineer, so I love the planning/problem solving stage as much as the actual build of any project. I intend to start a build log soon detailing my initial build plan, and I hope it gets picked apart with suggestions of improvement from the wealth of experience available here. Kind regards, Caleb